Email marketing has outlived many of today’s digital channels, but it’s still one of the most important tools in a marketer’s toolkit for curating and engaging individuals. While the tools have changed over the years, the need to measure and prove the success of your marketing and email efforts has grown. A proven industry standard is a method called “campaign tagging”. That is, adding custom URL query parameters to links that direct traffic to the desired website. For the purposes of this article, we will focus on campaign he parameters known as UTM parameters.
The most important part of measuring the success of your email campaign is consistency. All links back to your website should be properly tagged and tagged with nearly the same information. This can be a problem if you are doing this manually. I often see links completely missing campaign parameters, especially in places like the footer. Certain email tools have the ability to automatically tag links, greatly reducing the amount of mistakes that can be made when sending emails, but other platforms such as Adobe Marketo Engage does not have these features built in. Like the new Google Chrome extension, there are some workarounds and tools available. Marketo UTM by +Bounteoushelps automatically add UTM parameters to all links in emails saved in Marketo Engage.
Best practices for adding UTM parameters to emails in Adobe Marketo Engage
When composing emails in Adobe Marketo Engage, keep these tips in mind to ensure your emails are properly tagged and improve your marketing attribution.
Add campaign tags to all links.yes all links
It may seem obvious, but all links to your site should be tagged. Remember to check for hard-to-find items with embedded links, such as images and signatures.
Use consistent tagging for links to your site
There are several UTM parameters available. The three most common are sources, media, and campaigns. These must be exactly the same for all links pointing to your site. Consider using the parameters UTM Content or UTM Term if you want to add extra information to distinguish which link was clicked.
Use a QA process to ensure properly tagged links
Ensuring links are properly tagged is a team sport. Everyone should understand why it’s important to tag links and what they look like when tagged correctly. Train your team and build this into your processes so that outbound email is checked regularly. Don’t send important special promotional emails without proof of their success.
Using Marketo’s Chrome Extension +UTM by Bounteous
UTM parameters can be added manually, but this process is often tedious and error prone. The Chrome extension for adding campaign tags to emails in Marketo Engage removes these challenges by making it easy to add parameters. This tool was created to help enterprise clients and ensure consistency between emails. I’m glad it’s now available for everyone.
+Benefits of Using the UTM for Marketo Chrome Extension
Bounteus is Chrome extension When enabled, it traverses the specific email’s module and auto-populates the 7 UTM parameters using the Marketo API. The user can configure values for utm_content, utm_source, utm_campaign, utm_content, utm_term, utm_marketing_tactic, and utm_creative_format. HTML mobile and dynamic content links are supported. Image mobile links are not currently supported because the Marketo API does not expose image mobile links.
What does that mean for marketers?
This extension gives marketers a cleaner and more efficient way to create UTM parameters as well as add them to emails. No other extension has both. Additionally, this extension helps eliminate human error and can be customized as needed based on company objectives.
+Setting up the UTM for Marketing Chrome Extension
1. Install extensions
Download the Chrome extension here and add it to your Chrome profile.
2. Create a service account
Marketo requires you to create a Marketo API account/service to use the Chrome extension. Here are the steps required to create a custom role, API user, and LaunchPoint service.
- Create a security role named “Auto Tagger Chrome Extension”. There are only two API permissions: 1) Authorize Assets 2) Read/Write Assets
- Create an API-only user associated with the role “Auto Tagger Chrome Extension”. Suggested name: “Auto Tagger Chrome Extension” Any email address works, such as “chrome@chrome.invalid”.
- Create a new launch point service for the API-only user created in step 2. custom type. Suggested display name and description: “Auto Tagger Chrome Extension”
- Record the client ID and secret and use the app’s[構成]Fill in the section.
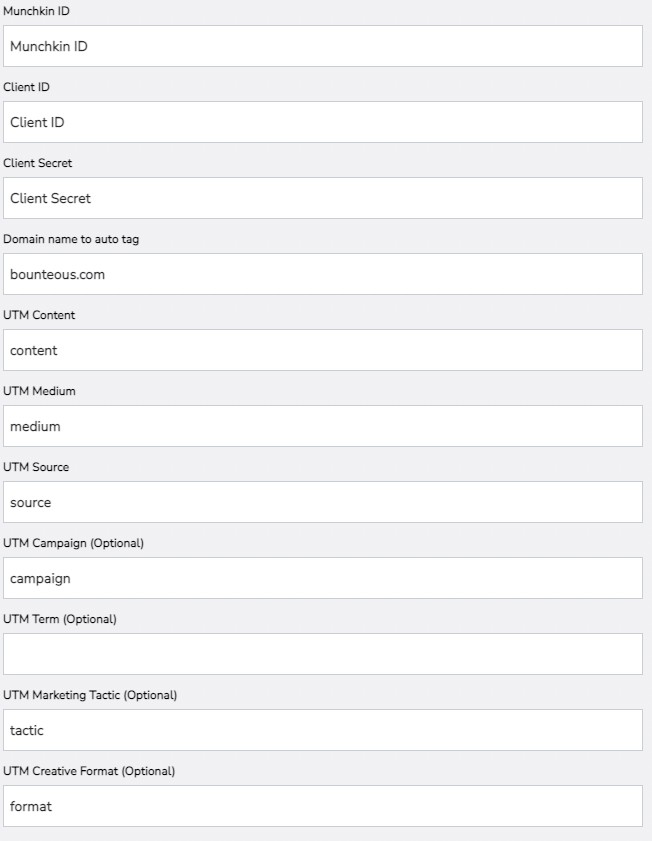
3. Add UTM values
Configure other values to enter in the UTM section of the configuration.
+Using UTM Marketo Extensions
Note: Before you start, make sure you have entered your UTM value and API key.
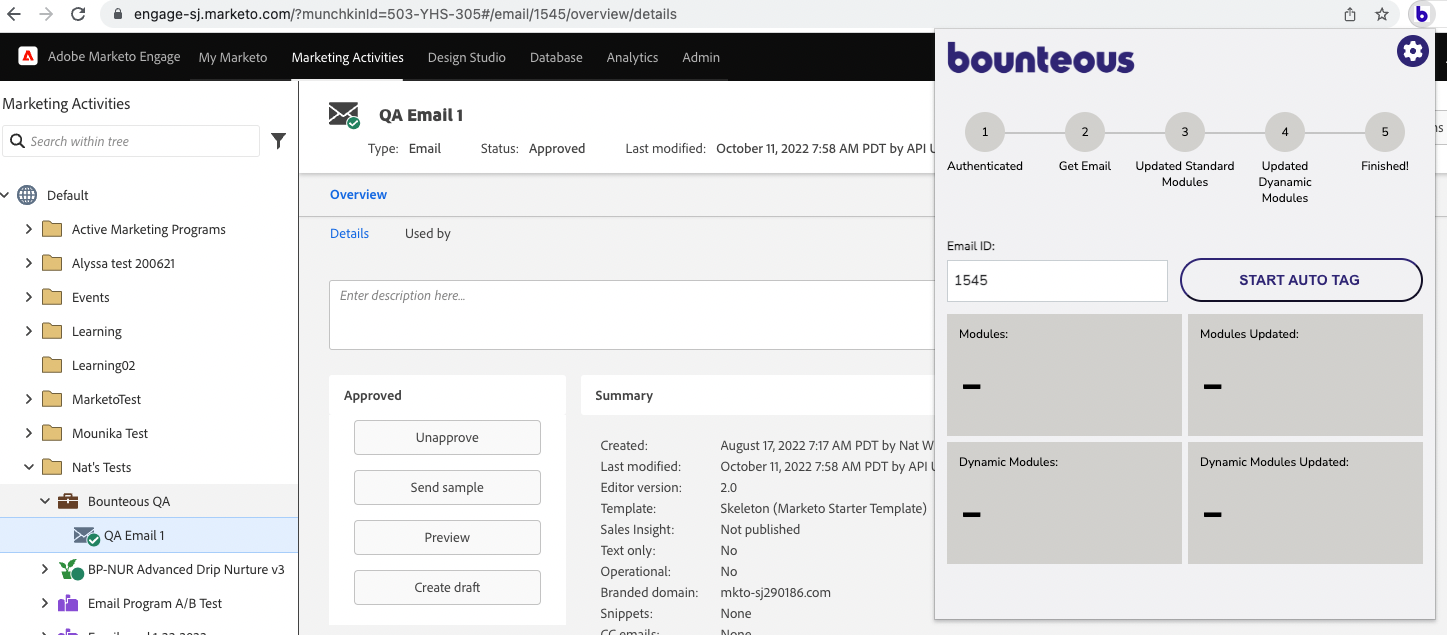
- Go to Email in Marketo. Approve the email if it is not already approved.
- To activate the extension, click the Bounteous icon on the toolbar.
- A pop-up window similar to the following will appear.
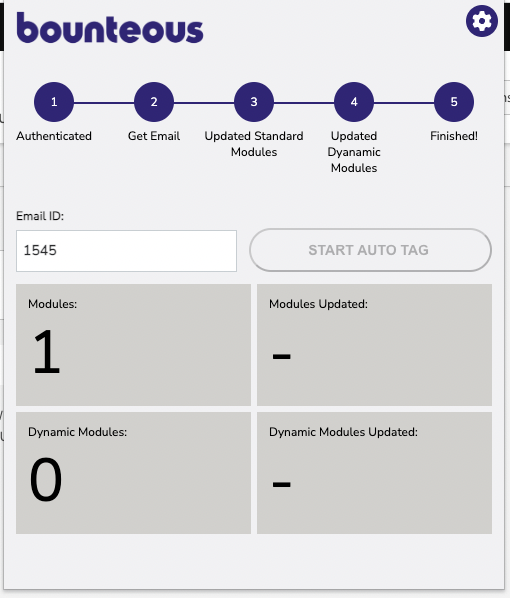
- Select “Start auto-tagging”
- The extension will automatically go through the email and apply the tags configured in the setup section.
- The process bar will indicate the end when complete.
Please note the following:
This extension only supports HTML and Text module types.
The Marketo API does not expose link URLs in image modules, so those links (if any) cannot be auto-tagged.
Why not try it?
This chrome extension is available for free. Download now and start automating your processes today.